If your favorite eye CC is still broken from the most recent Expansion Pack release, this helpful tutorial can show you how to finally fix CC lashes!
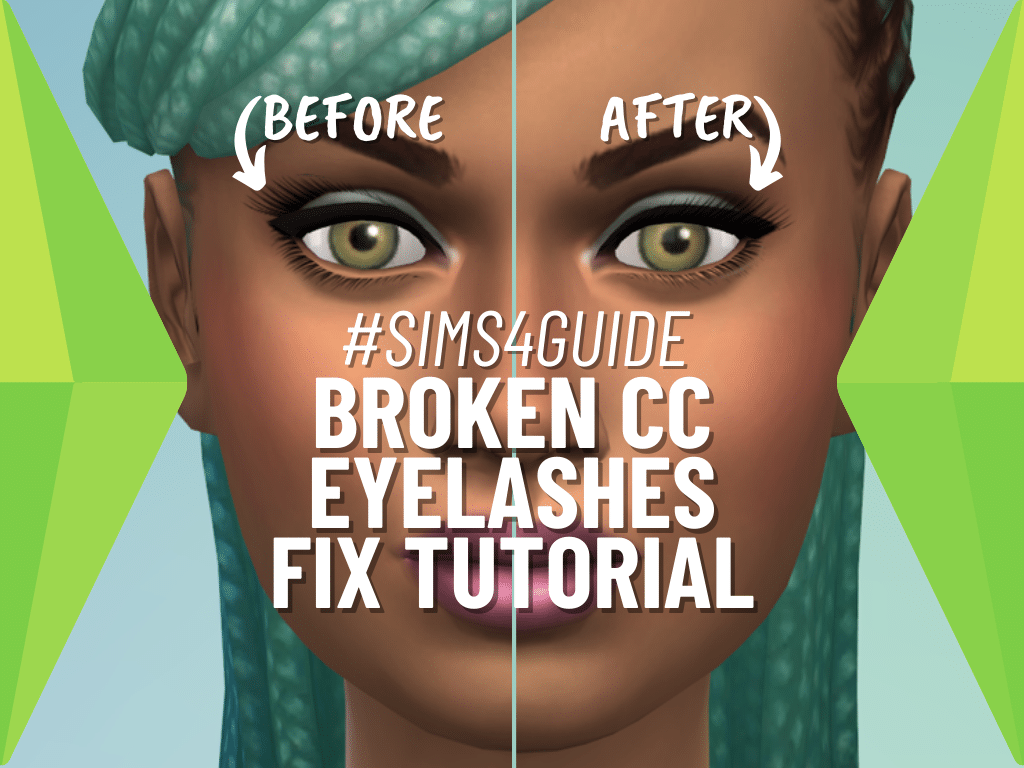
The Sims 4 Lovestruck brought lots of fun changes to the game but as is usual for these updates, things got broken, too. We’ve already talked about how CC eyelashes were broken and showed you how to re-categorize them in CAS, and now thanks to destraum on Tumblr, we have a tutorial on how to fix CC lashes that haven’t already been updated by their creators.
For this tutorial, you will need the latest version of Sims4Studio along with Blender. Initially I tried to use Blender 2.79 as that’s the version destraum used, but it wouldn’t open on my PC so I went with the newest version which opened without incident.
Let’s Fix CC Lashes Together!

I’m going to follow destraum’s tutorial on how to fix CC lashes for this post, and as someone with almost no experience in Blender this is a great opportunity to gauge how easy the tutorial is. For this tutorial I am using a very old pair of 3D lashes from Kijiko. Kijiko has already updated their CC lashes but since the old files are still there, they make for a great example to use in this tutorial. It’s important to note that since I am using a newer version of Blender, my UI is slightly different than the one in the tutorial (I will be sharing my own screenshots here).
Be sure to read to the end where I’ll share some troubleshooting tips if you’re a newbie like I am!
Re-categorizing CC Lashes
Although we have posted on how to do this already, Sims4Studio has since updated its categories so we’re going to touch on it again here.
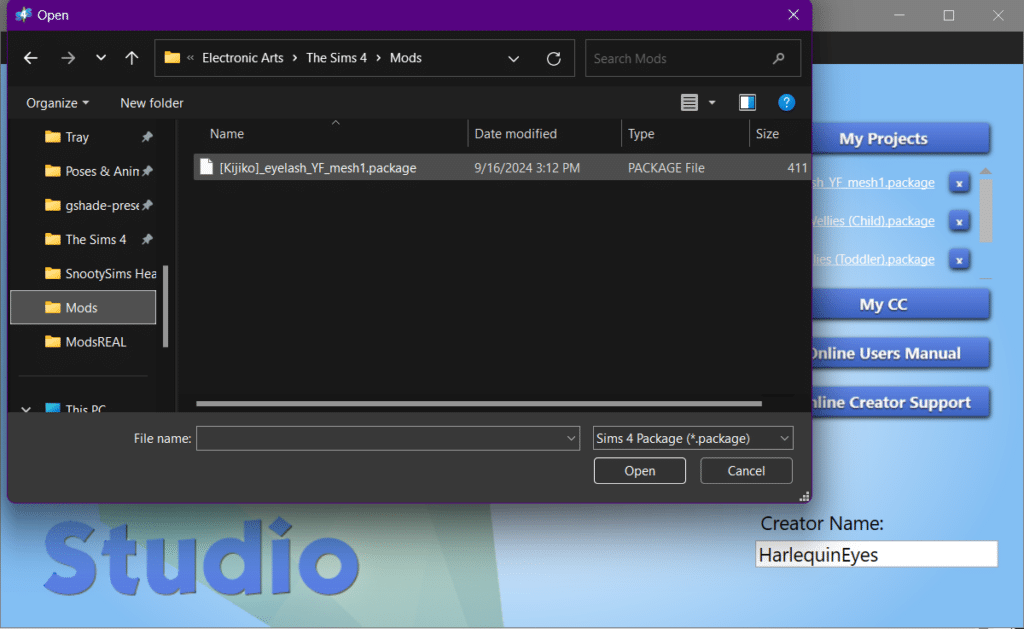
When you open Sims4Studio there is a button on the top right that says My Projects. Click this button and then navigate to the CC eyelashes you want to update which should be somewhere in your Mods folder.
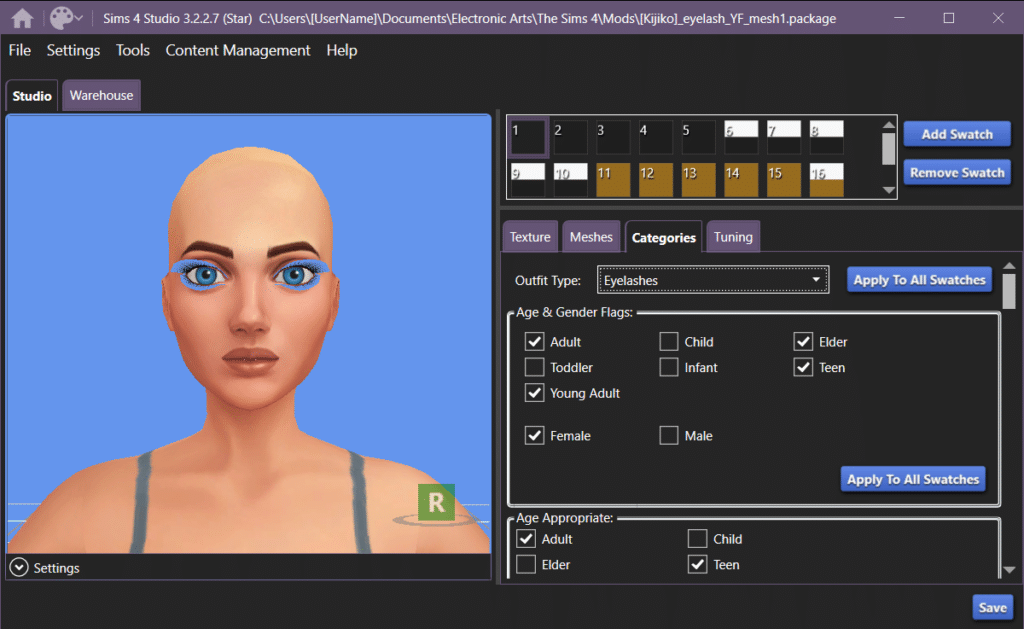
Click on the Categories tab on the right side below the swatches, and in the Outfit Type drop down menu select “Eyelashes” (in our older tutorial this was made part of the “Mask Detail” category). Make sure to click the Apply To All Swatches button so that every variation of the lashes is re-categorized! Click Save after this step so you don’t have to worry about accidentally undoing it later.
Transferring The Mesh
Now we are going to export the mesh so we can fix its placement on your sims’ faces.
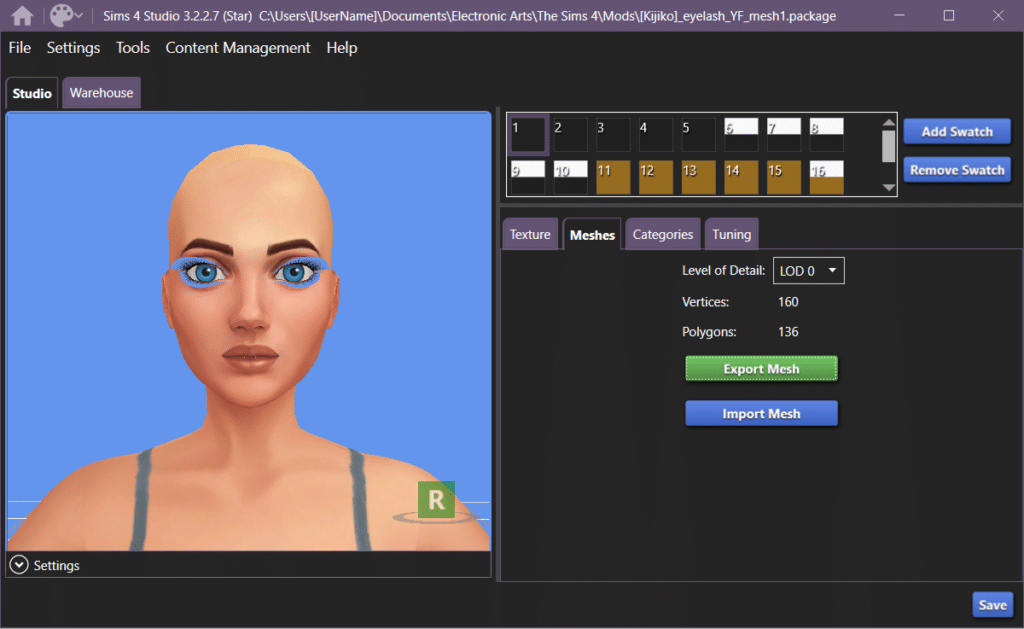
This time, click the Meshes tab below the swatches and then select the Export Mesh button. Give the file a name that you’ll remember and put it somewhere easy to find, like your desktop.
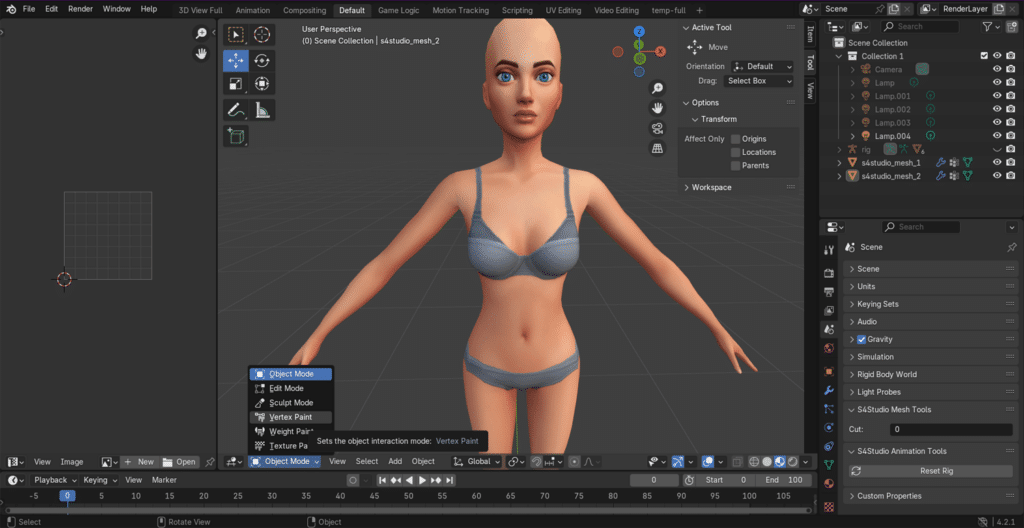
Run Blender, and then go to File…Open and select the CC Lash file. The S4S mannequin should load in with the eyelashes mesh.

If you want to move the mannequin into a better position so you can see the lashes up close, hover your mouse over the “Move the View” option (shaped like a hand✋) and while over it, click & hold your primary mouse button and move it around to move the mannequin. You can do the same thing with the Zoom In/Out option right above the hand to change how far from the mannequin you are. If your mouse has a center wheel, clicking & holding the wheel down while you move the mouse will change your viewing angle like it does in-game.
Fixing The Mesh
This next part was pretty tricky for me, as the UI for Blender isn’t very intuitive if you don’t have any experience. Luckily I stumbled through it so hopefully you don’t have to!
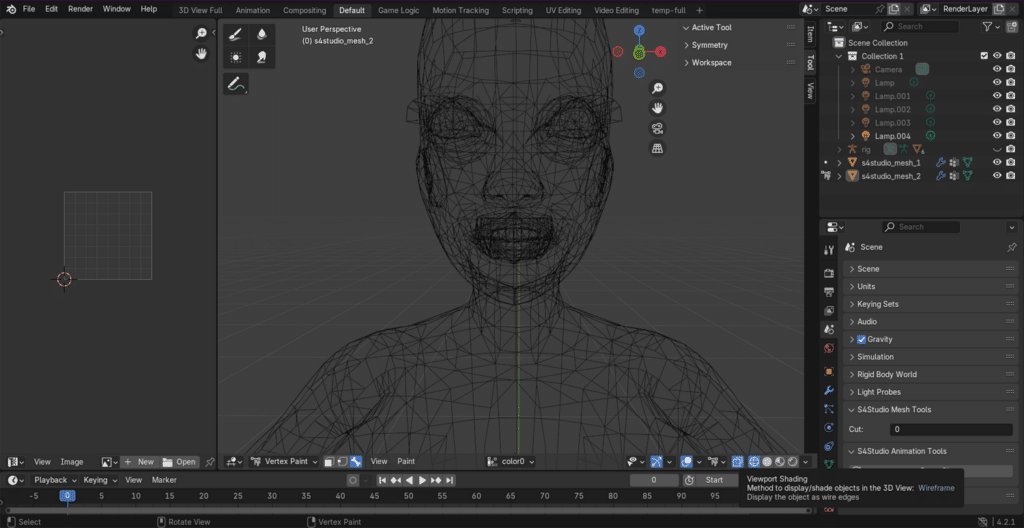
Now we need to change the view in Blender to the Wireform. You can do this by pressing the Z key on your keyboard and choosing it from the menu that comes up, or if you look at the bottom right corner of the viewer you’ll see a bar with different viewing options that you can click between.

In older versions of Blender like the one in destraum’s tutorial, this menu is located in a different spot on the UI, so if you have a different version you may need to look around or just use the Z key method.

Next, right-click anywhere in the viewing area and a color wheel will pop up. On the top left of this window is a square swatch color (it will probably default to white); click that and then choose the Hex tab, enter the Hex 007F3F and hit Enter.

After you’ve set the Hex color, click on the eyelashes part of the Wireform. Then on the bottom of the screen in the Paint menu, select Set Vertex Colors. You can also hit CTRL+X but make sure the lashes are selected first.
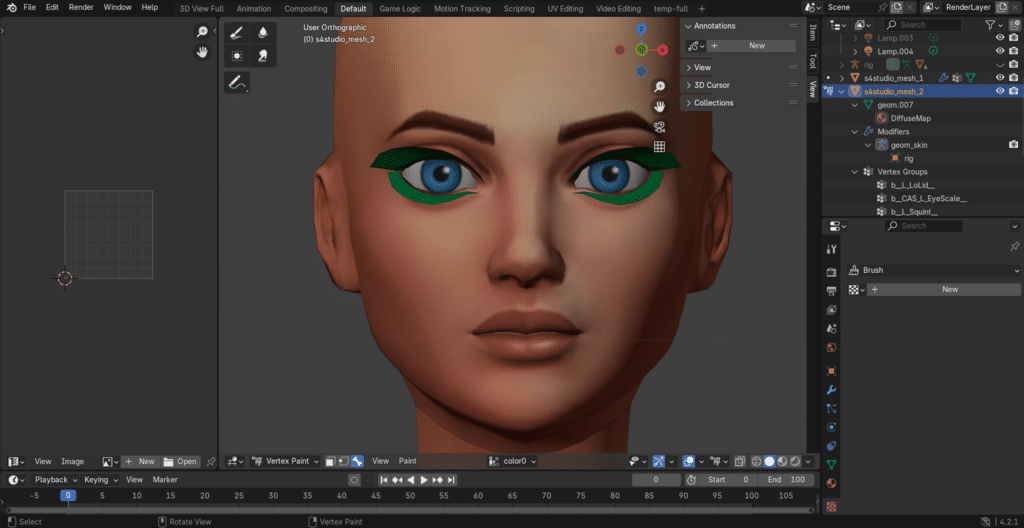
Now, in the tutorial version there are images showing the lash mesh being filled with color as part of the wireform, first a random blue hue which changed to green after the Vertex Colors were set to our Hex code. I was unable to get it to show for me the same way; in order to see the color change I had to click the Solid Display view (located on the bottom right next to the wireform option). You can also get this view by hitting Z and clicking Solid.
Once you’ve made these changes and the lashes have turned green, hit CTRL+S or navigate to File…Save to save your mesh update.
More on SNOOTYSIMS: Want to see what other things you can make with Sims4Studio, Blender, and other free programs? We can help get you started!

Replacing The Old Mesh With The Updated One
It’s time to bring the fixed mesh back into Sims4Studio! This is the easiest part.

In the Meshes tab, click Import Mesh and select your newly updated Blender file. Once imported, hit Save on the bottom right.
Checking Your Work

The updated version of Sims4Studio places CC lashes in the proper location on the mannequin, even if they’re wrong in-game. You’ll want to run The Sims 4 and open CAS to see if your edits worked. Compared to the first time around you can see now that the CC eyelashes sit much closer to the waterline of the sim’s eyes, meaning I was successful in my attempt to fix CC lashes!
Troubleshooting & Tips
Because I used a different version of Blender, there was some on-the-go learning while attempting to fix CC lashes. Here is some advice from my experience:
- If you’re stuck on a step, make sure to look through the original tutorial by destraum and our attempt here in case the version of Blender you have doesn’t match. The keyboard shortcuts seem to be the same regardless of which UI you have so if all else fails, that’s the way to go.
- As previously mentioned, the programs used here don’t always give us proper visual feedback. Sims4Studio didn’t show the CC eyelashes with their improper placement and I didn’t get the color feedback in Blender like destraum did when I updated the Vertex colors. Don’t get discouraged if you did things correctly but aren’t seeing a change, just check it in-game for the most accurate feedback.
- If you’re afraid to break the mesh when editing in Blender, instead of selecting Save when you’re done you can click File…Save As or CTRL+Shift+S and give it a different name. That way if you make a mistake you still have the original mesh file to try again/re-import.
- Blender took a while to open on my computer. If it looks like it’s doing nothing when you launch it, give it a few minutes.
- Having a mouse with a scroll wheel makes both programs easier to navigate. If you’re a laptop player and usually use the touchpad, I definitely recommend getting a wireless mouse.
Conclusion
With the wonderful tutorial by destraum we can now fix CC eyelashes from all of our favorite creators, even those who have stopped making content for The Sims 4. Although working with these programs can be intimidating, if you take your time and follow the directions carefully even the most inexperienced simmer can make it through! We hope that this tutorial and our included testing are able to help you get back to using CC you loved, and maybe even open the door for you to try more! Enjoy your updated eyes, and happy simming!


Your Author: Hi! I'm Nicole
SnootySims @ Patreon
Discuss with the SnootySims-Community:
What are your thoughts on this post? We'd absolutely love to hear your opinion! Feel free to drop a comment and share your thoughts. If you happen to spot a broken link or notice any outdated mods or custom content, please give us a heads up. We're a small team of Sims enthusiasts doing our best, and sometimes, we might miss a little hiccup. Your feedback means the world to us, and we appreciate your support immensely. Thank you a bunch! 🌈🎮