We have recently introduced you to the official team-up of The Sims 4 with Overworld’s CurseForge. This time, we are walking you through the newly launched CurseForge Mod Manager for The Sims 4. Here’s everything you need to know about this valuable TS4 tool, plus the full details on how to install it on your device.

What is The CurseForge Mod Manager?

To give you a recap, The Sims 4 launched an official mod hub in collaboration with CurseForge last November 14, 2022. CurseForge is a massive gaming repository of mods and custom content, and it is fueled by Overwolf, a platform designed for video game creators and developers worldwide. Just last December 6, 2022, CurseForge for The Sims 4 already rolled out the official Mod Manager for the game. Through this efficient little tool, it is now possible to organize and update all downloaded custom content and mods, as well as find new ones to add to the game.
Installing the CurseForge Mod Manager for TS4

The CurseForge Mod Manager app is available for a multitude of videogames, including The Sims 4. Installing this nifty tool on your device would allow you to conveniently manage, download, and update all your mods and CC. As of this writing, the CurseForge Mod Manager app for The Sims 4 is only available for Windows users. Support for Mac devices will follow in 2023. As for Linux users, there are no updates yet. This section of the article provides a step-by-step guide on how you can install the CurseForge Mod Manager app for your game.
Steps on How to Install the CurseForge Mod Manager:
1. Run the Installer.

The first step is to head over to the CurseForge App. By clicking this website, you can read about the features of the Mod Manager app. After checking everything, click the “Download” button to download the app on your device. Then, head on to your Downloads folder and double-click on the CurseForge installer. Take note that it appears as a black-and-white icon with a fire symbol in the middle. An installation window will appear. Select the language in the left corner and click the “Next” button.
2. Designate the Program Installation Folder.

The second step is to select the installation folder for the CurseForge Mod Manager app. There is already a pre-selected folder but you may change this. You also have the option to create desktop shortcuts for both CurseForge and Overwolf. Before clicking the “Next” button, click on the Terms and the Privacy Policy.
3. Read the Terms and the Privacy Policy.

Reading the Terms and Privacy of The Sims 4 Mod Manager is important as these specify the conditions for installing the app on your device and inform you on which data and information will be collected from you. After reading everything, you can now click “Accept & Install”.
4. Wait for the Download.

The download will now begin. You can see the progress in the installation window. Wait patiently for this process to finish.
5. Wait for a Confirmation Message to appear.

After the installation of the CurseForge Mod Manager, a confirmation message will appear saying the app “has been installed successfully”. Congratulations!
6. Launch the Mod Manager.

Go on and click “Launch” to open the Mod Manager. You are now ready to begin using this practical tool.
Using the CurseForge Mod Manager for TS4

Now that you have succeeded in installing the Mod Manager, it’s time for us to teach you how to efficiently utilize it. This section will guide you in identifying the viable features of the Mod Manager and knowing how to download, manage, and update all the mods and CC that you have acquired for The Sims 4.
Steps on How to Use the CurseForge Mod Manager:
1. Choose The Sims 4 from the Roster of Games.
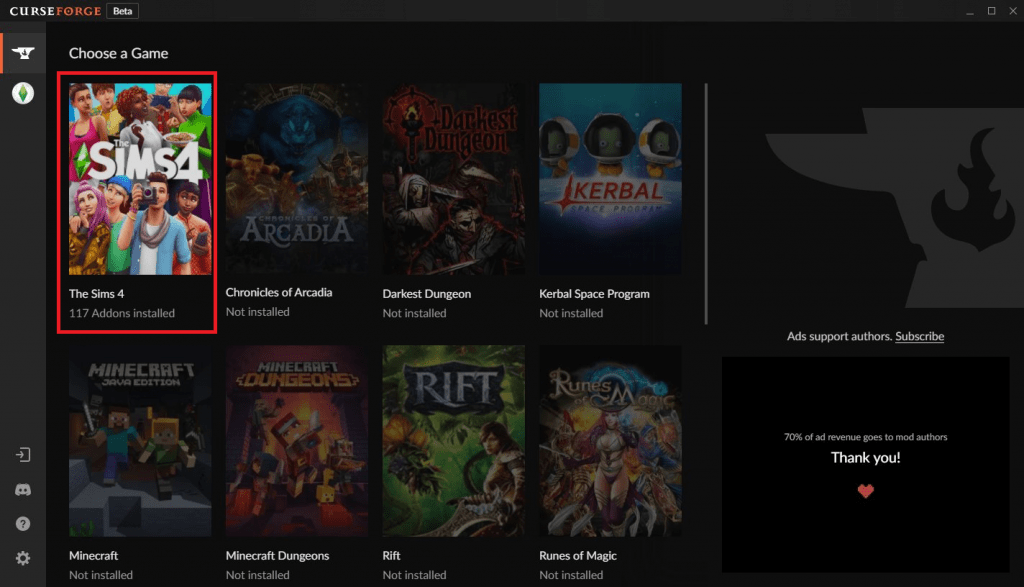
Launching the CurseForge Mod Manager will lead you to its Choose a Game home page where you’ll see a roster of games, such as Minecraft, Rift, Runes of Magic, Arcadia, and many others. Find The Sims 4 from the list and click on it.
2. Wait for the Welcome Banner to Appear.

After clicking The Sims 4, a welcome banner will appear. “Sul sul”, it says. This banner features a little information on how you can use the Mod Manager at your convenience. Click the orange “Check it out!” button to proceed.
3. Check the Downloadables.
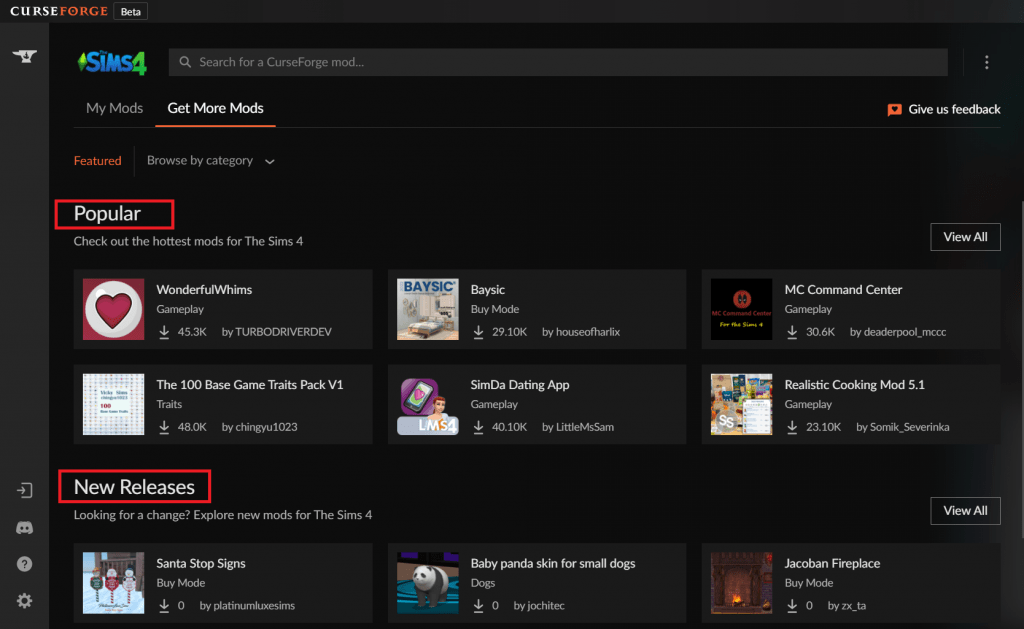
You will then be led to your Mod Manager home screen, with two tabs available on the top. The My Mods tab and the Get More Mods tab. Let’s discuss the latter first. The Get More Mods is where you’ll find the list of mods and CC that you can download for your game. You’ll easily find featured content under the Popular tab and the New Releases tab. Click the “View All” button under your selected tab to unload the entire list.
4. Utilize the Sorting Feature.
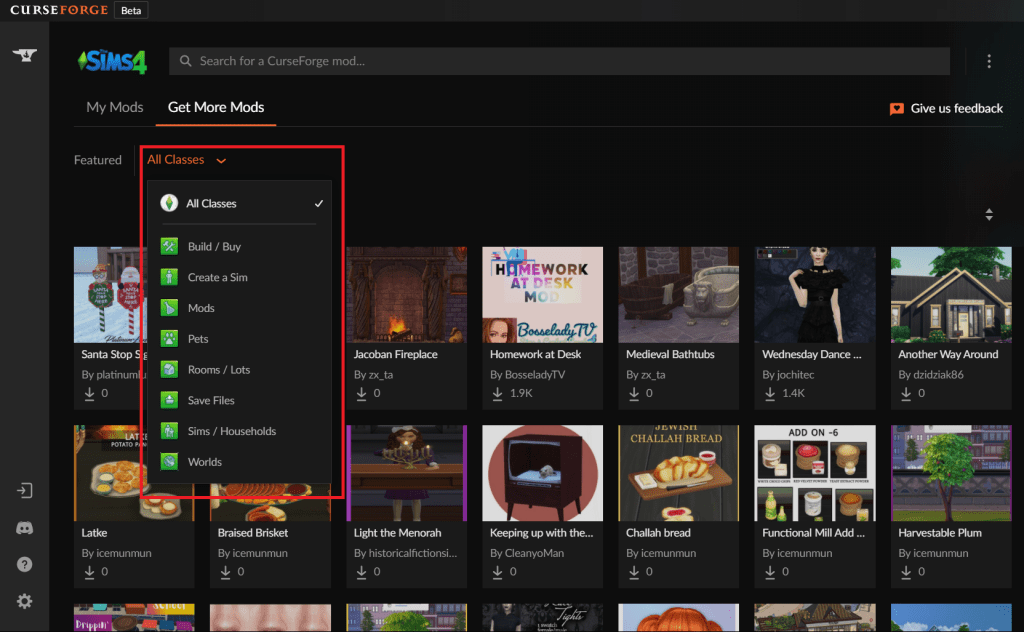
Alternatively, you can utilize the “Browse by Category” function, located right under the Get More Mods tab. This will allow you to sort your search for mods and CC depending on the classification that you select. You can check listed classes such as Build/Buy, Create a Sim, Rooms/Lots, Sims/Households, Worlds, and many others.
5. Check the Details of the CC or Mod.
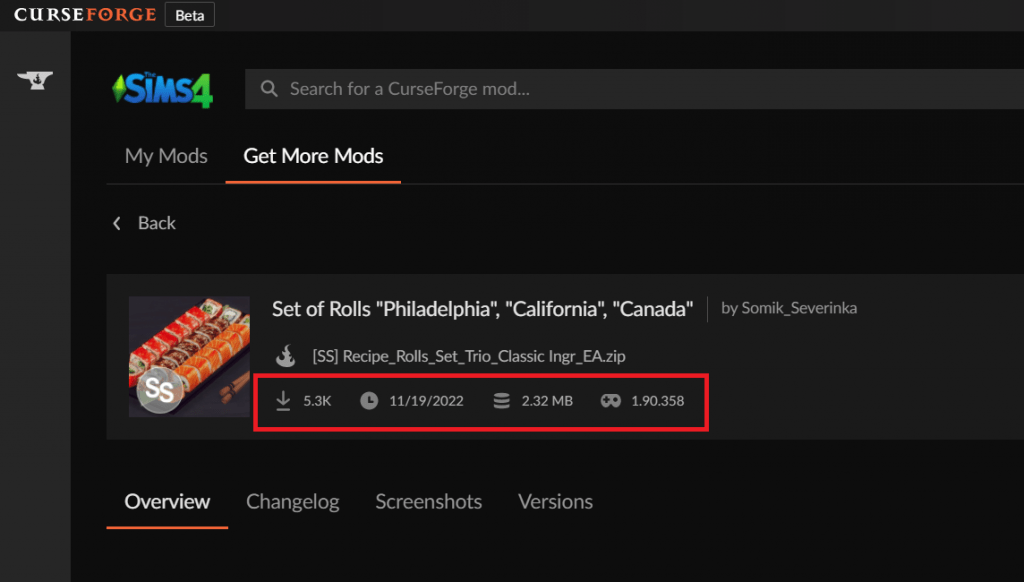
Once you click on a mod or a CC, you can view all the necessary details about it under its title. You can check how many times the CC or mod has been downloaded, the date when the file has been released, the exact size of the mod, and finally, the latest supported game version of the mod or CC! Take note that the last one is super crucial!
6. Read Other Important Details of the CC or Mod.
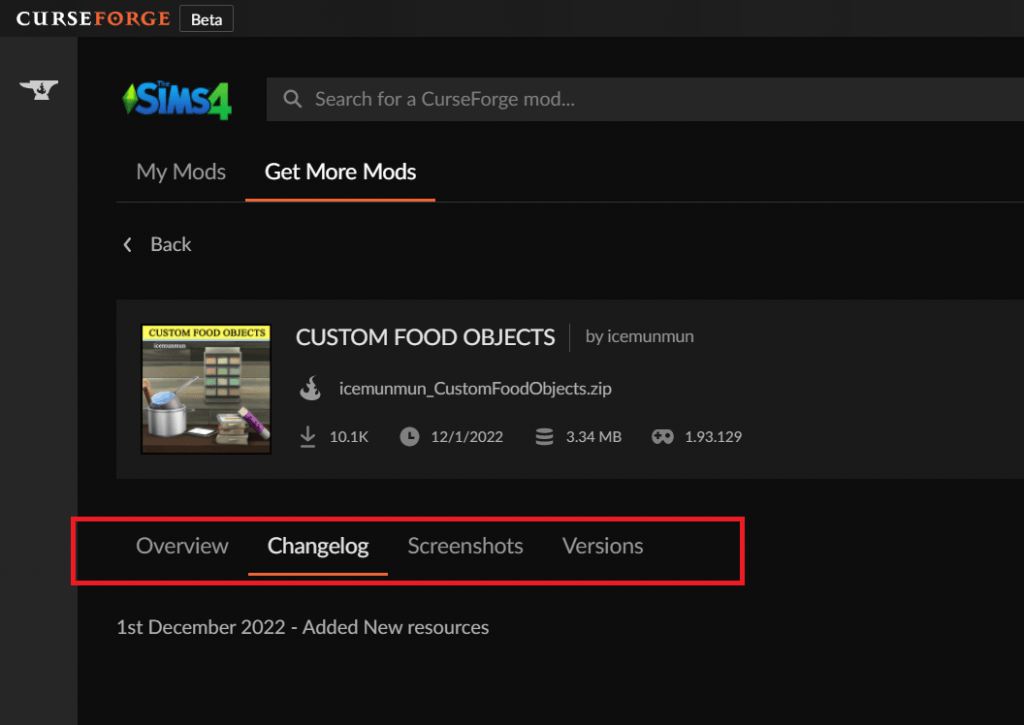
Aside from the basic details provided under the title, there are secondary details below that are also important. You can see a sidebar revealing an overview of the mod or the CC, the changelog which states all the updates, modifications, and added details of the item, and screenshots that show you actual in-game images of the mod/CC. Finally, the last part unveils the game versions of the item.
7. Update your Mods and CC.
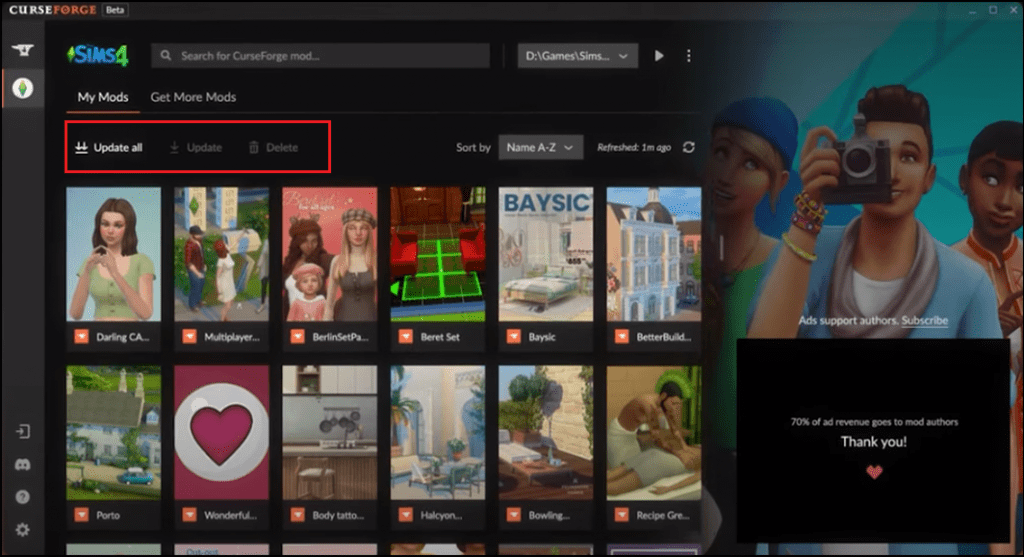
After shopping for all the mods and CC that you like, you can now manage these downloaded items in the Mod Manager. Click the My Mods tab next to the Get More Mods tab. Here, you can select a mod or CC and choose to singularly update or delete it. You may also select the “Update all” button to easily update all the mods and CC you have downloaded. If in case you have already downloaded hundreds of mods and CC, and you’re having trouble locating a certain item within the list, you can make use of the sort function on the upper left to help you.
8. Configure Other Settings.
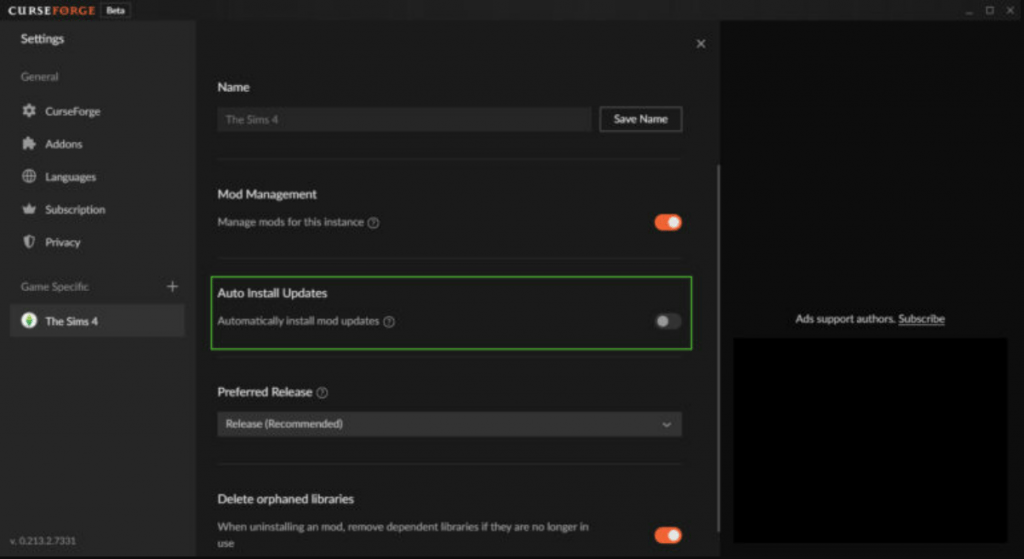
On the bottom left corner of the CurseForge Mod manager, you can find a gear icon. Click on this to access game-specific settings for The Sims 4. Here, you can choose to auto-install updates for The Sims 4. Doing so will take away your hassle of updating downloaded mods and CC one by one.
Final Thoughts
Since its release in 2014, The Sims 4 has undoubtedly worked hard to improve and maintain its status as a globally-loved game. It has never stopped surprising us with new developments and providing us with exciting advancements that make our gameplay more satisfying. With the release of the TS4 Mod Hub and Mod Manager, simmers all over the world will surely feel more delighted to run the game, with all the endless CC and mods readily available!
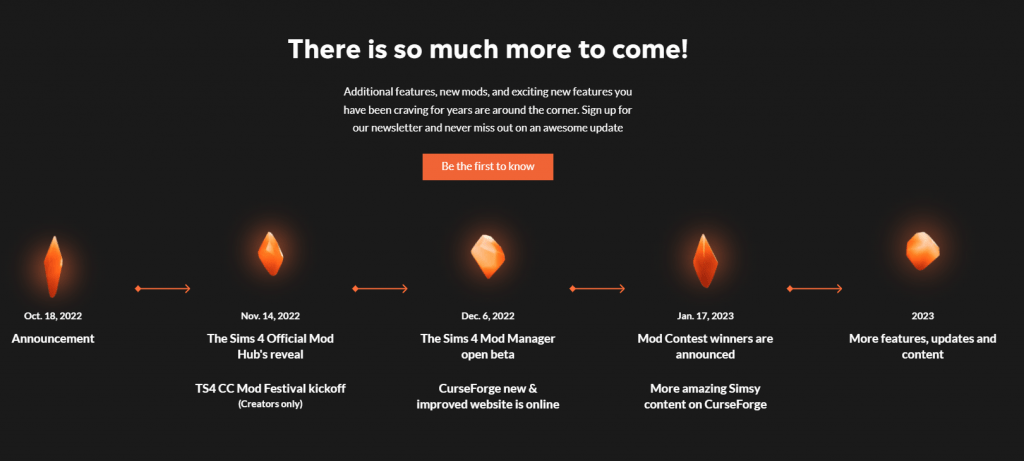
But the updates and upgrades do not end here! The Sims 4 has pledged that there will be more things to look forward to in the future when it comes to playing the game. Hence, we here at SnootySims will definitely do our best to keep you posted on all things TS4. As always, happy playing simmers!
